


Table of Contents

Planning a wedding is both extremely exciting and overwhelming. You need to solve issues regarding the budget, guest list, venue, and other ceremony details. One element that can tie everything together is wedding signs. They can guide your guests, decorate with grace, and convey messages to ensure your wedding runs smoothly. If you’ve been trying to learn how to make wedding signs, then you’re in the right place.
This guide covers all the wedding sign types you need to help you decide between DIY and hiring a pro, and to provide step-by-step instructions to make your own.
Key Takeaways
- The best wedding signs are welcome displays, ceremony signs, reception boards, and seating charts, among others.
- If you want to print perfect designs, you need to choose the right mood board, wedding sign material, and size.
- Deciding on how to make a wedding sign depends on your time and resources.
- DIY wedding signs may take more time than using online tools, and the final designs may not appear the way you initially envisioned.
Types of Wedding Signs You Can Make
So what signs do you need for your wedding? While many are nice to have for the aesthetics, others cut through the chaos and ensure your guests know exactly where to go and what to do on your special day. Here’s what we, as a sign-printing company, say are signs you need on your dream day.
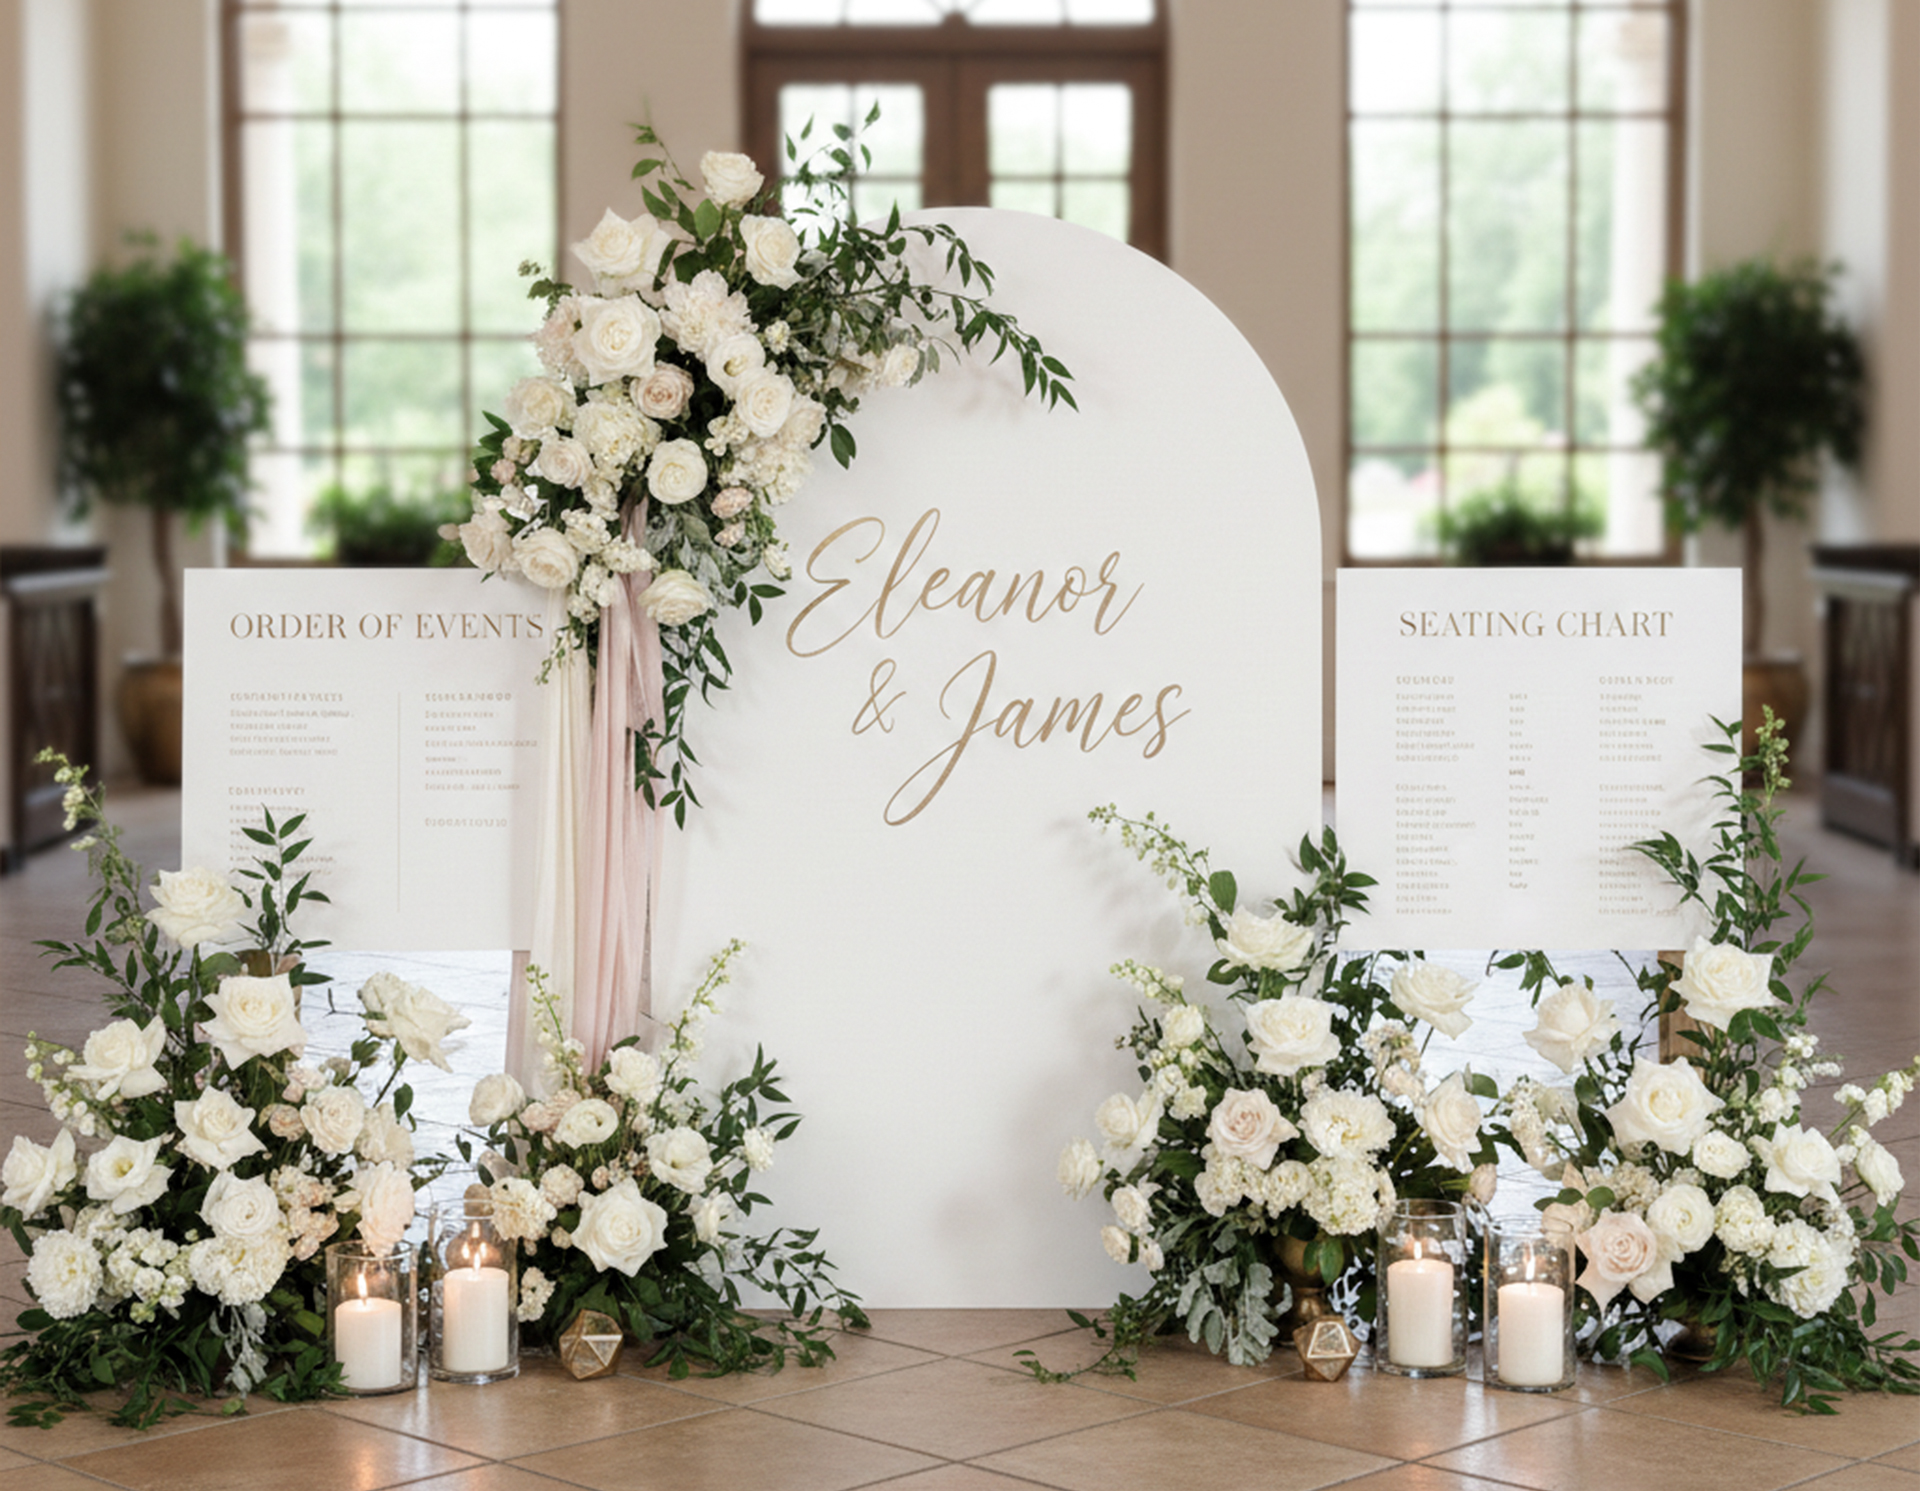
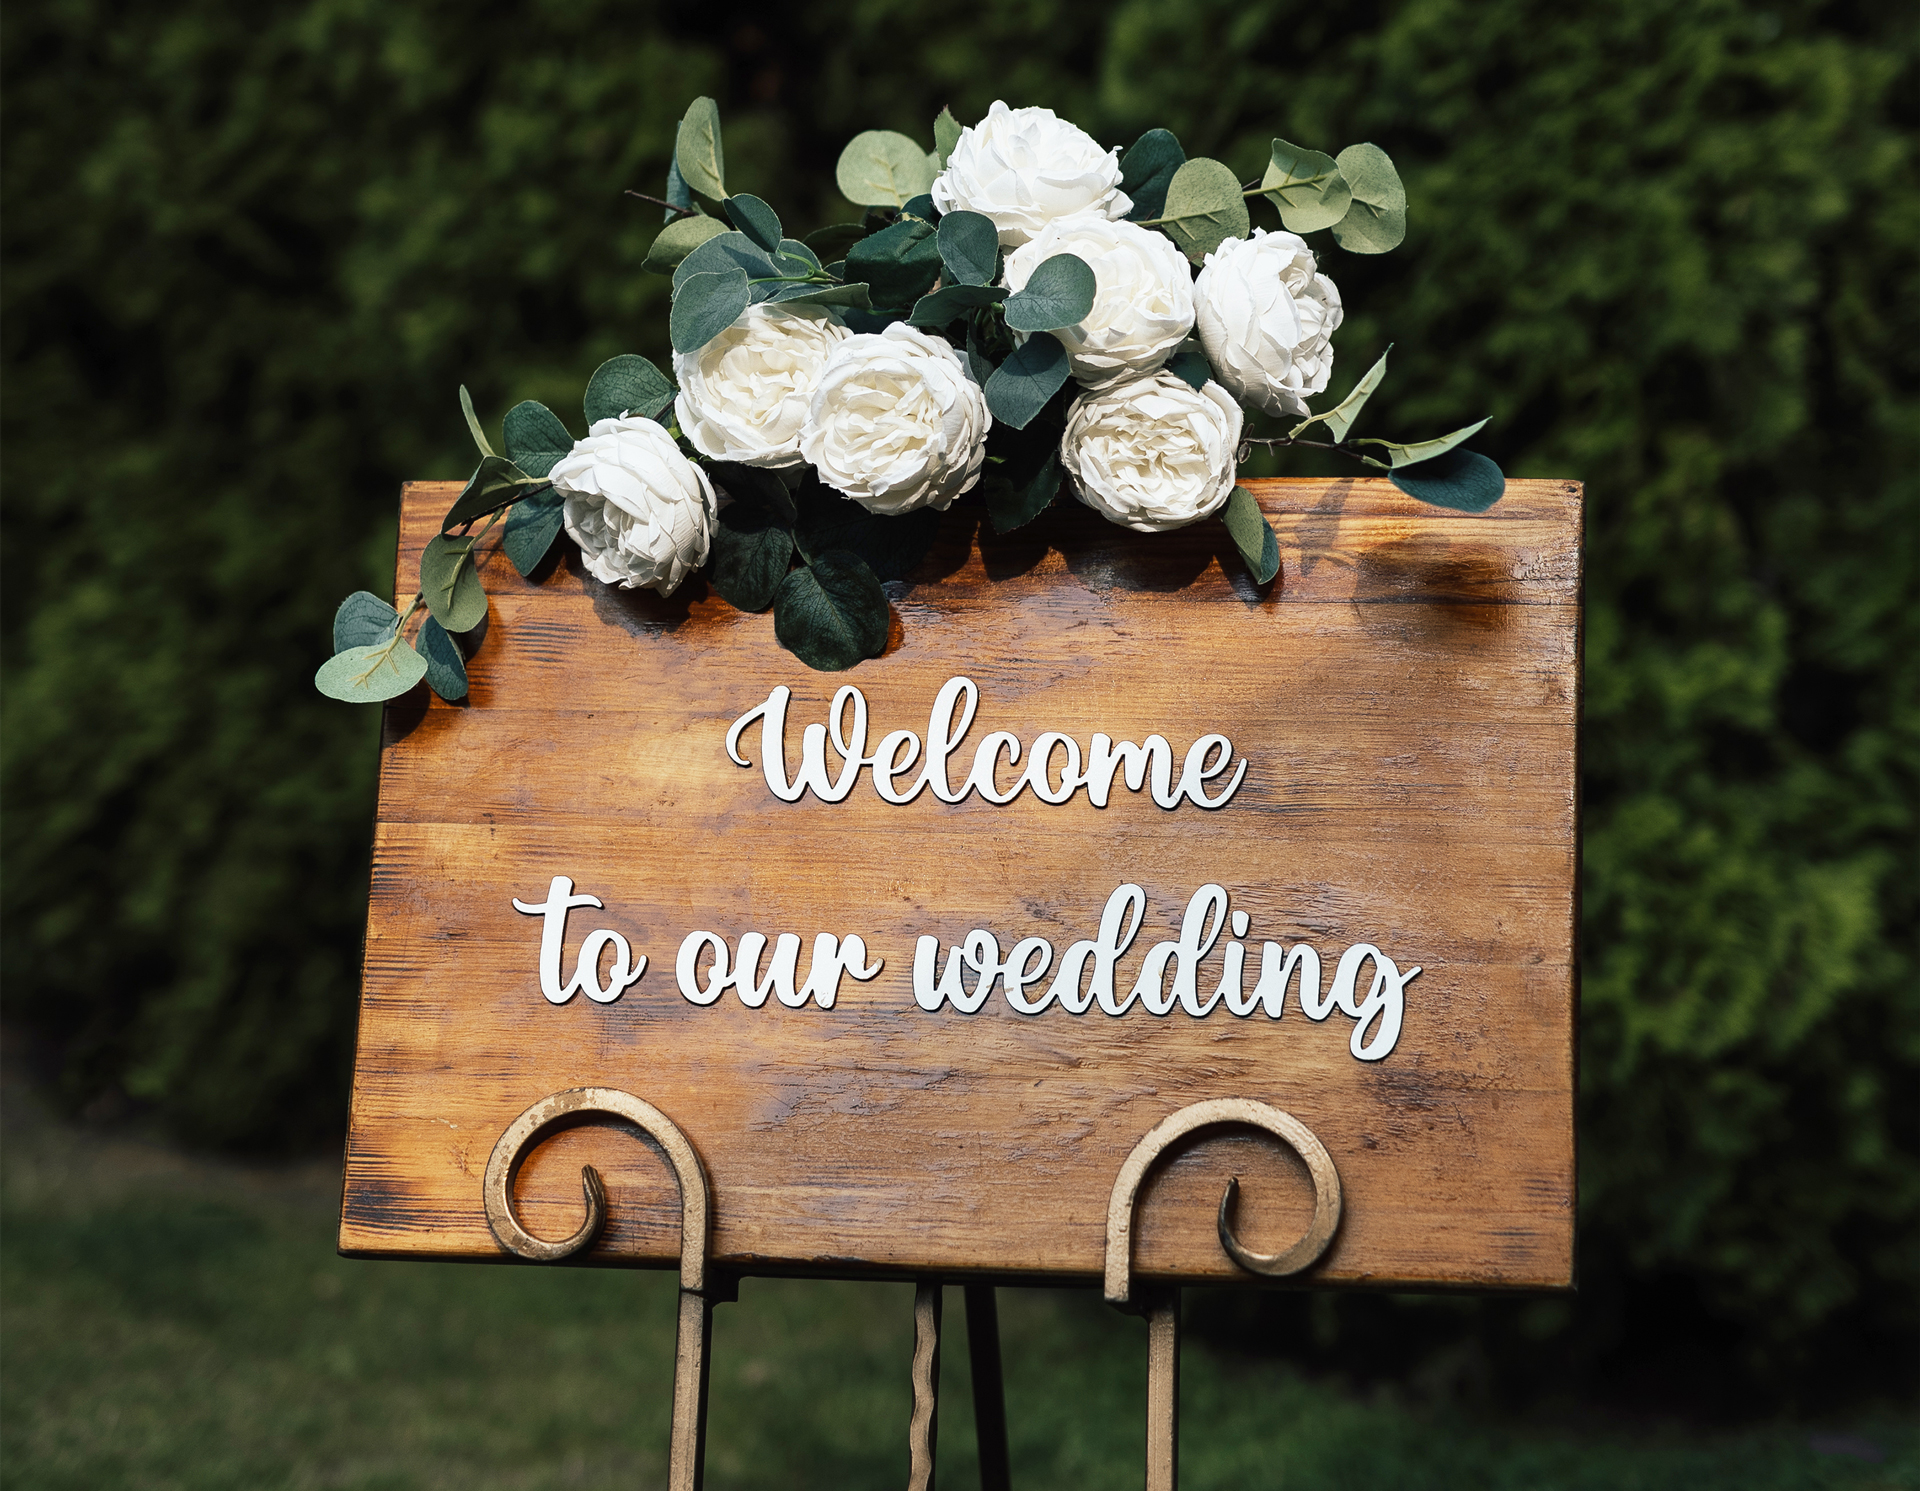
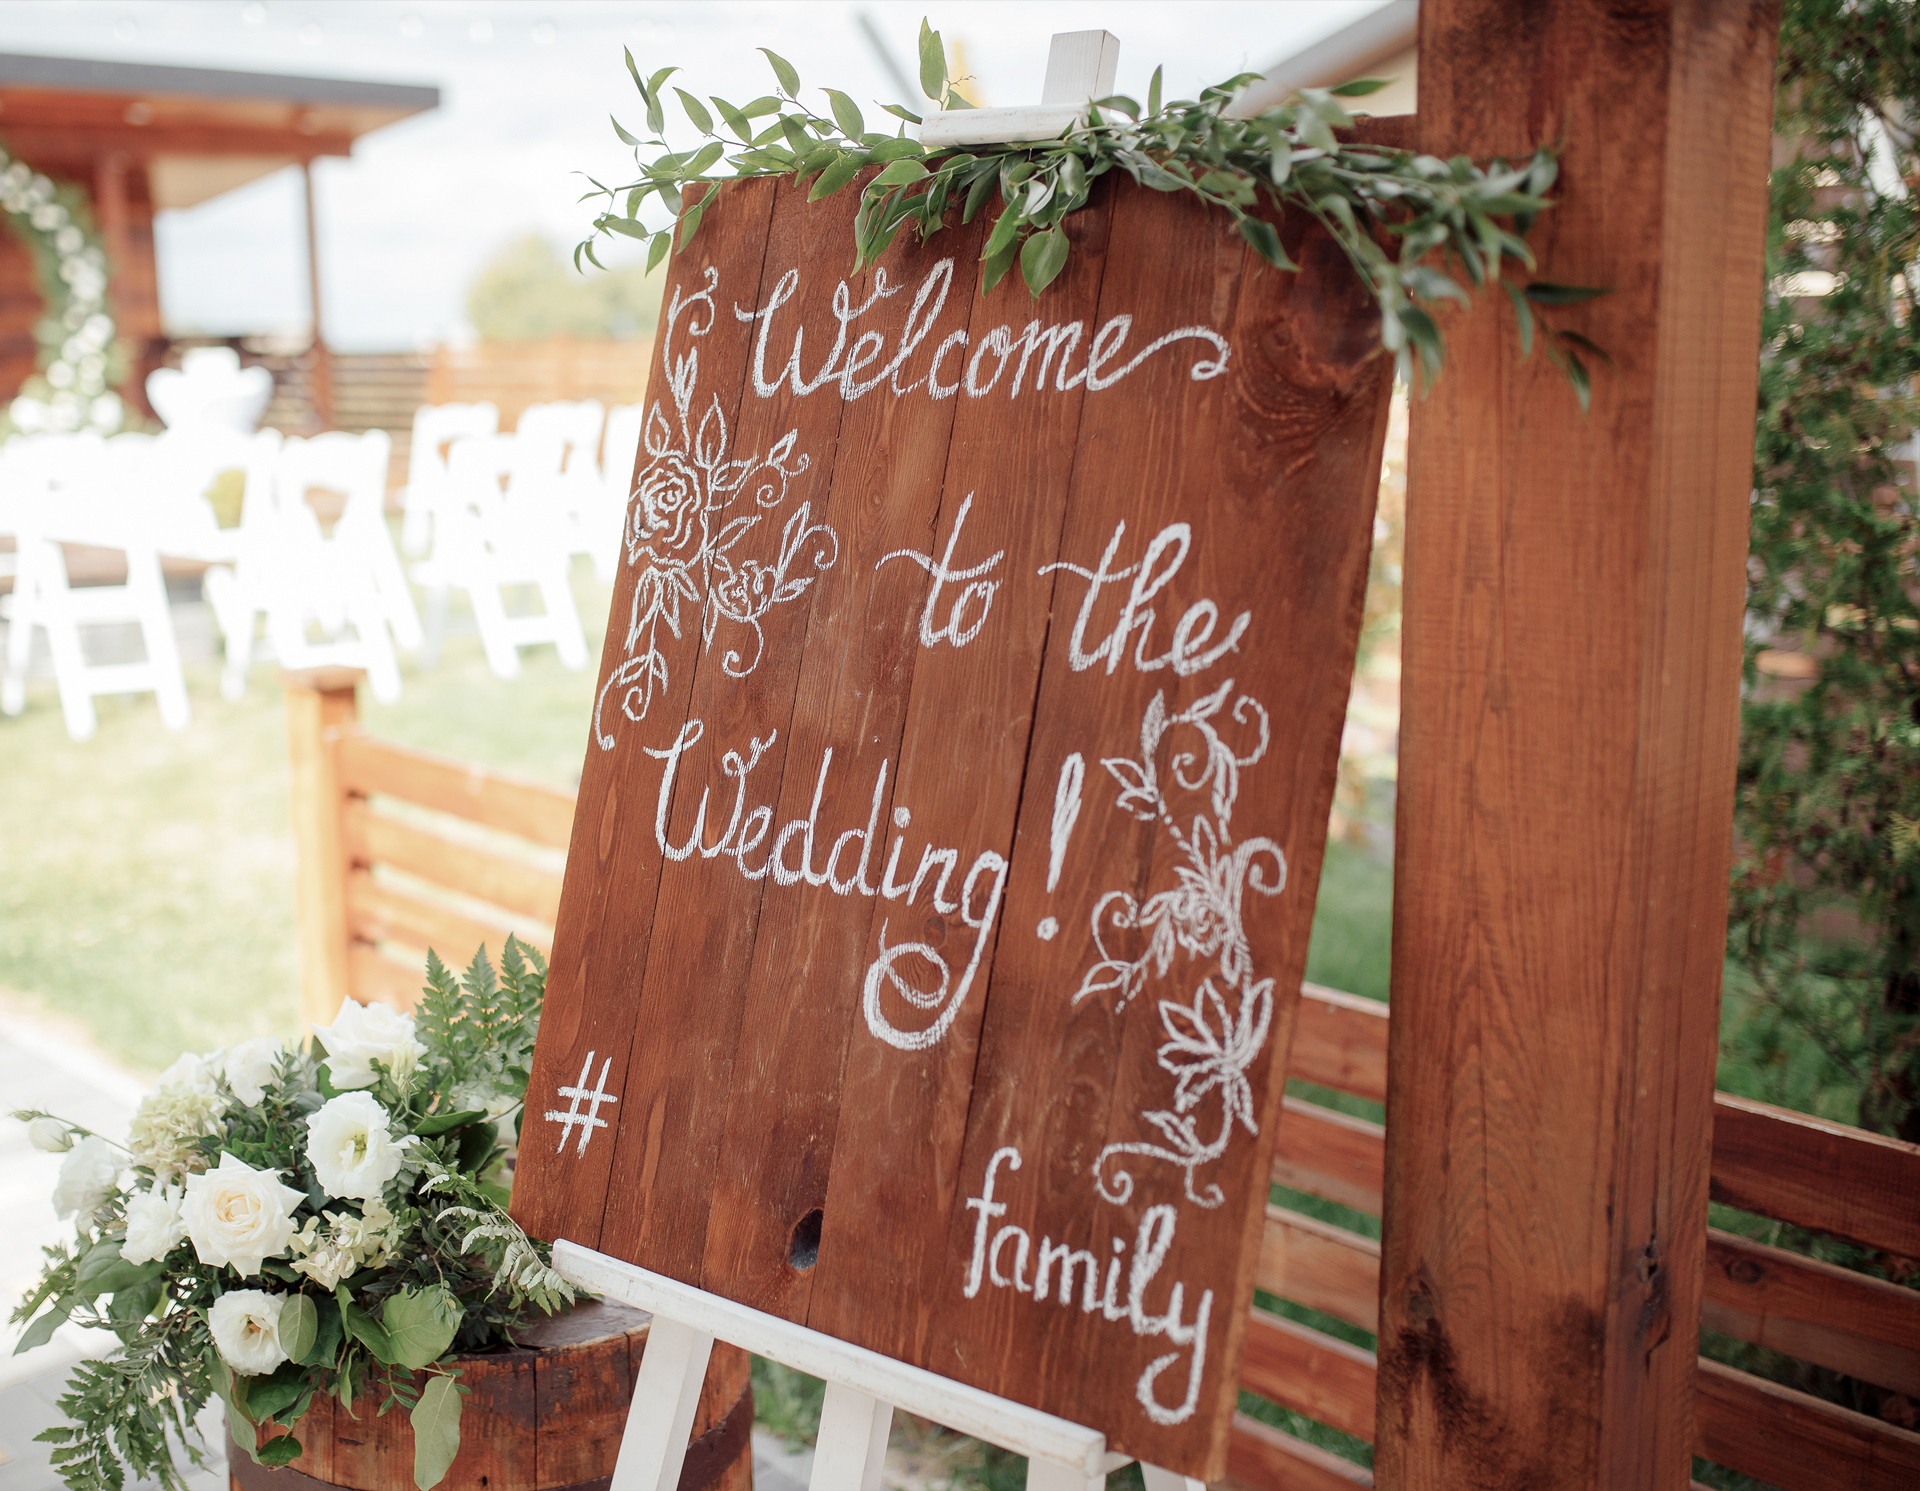
Welcome Signs
Welcome signs, typically positioned at the venue entrance, immediately identify the location for guests. These signs mainly display the bride and groom’s names and give guests a warm welcome. Welcome signs with vivid designs also offer an excellent photo opportunity for Insta-lovers to snap shots and share them online.
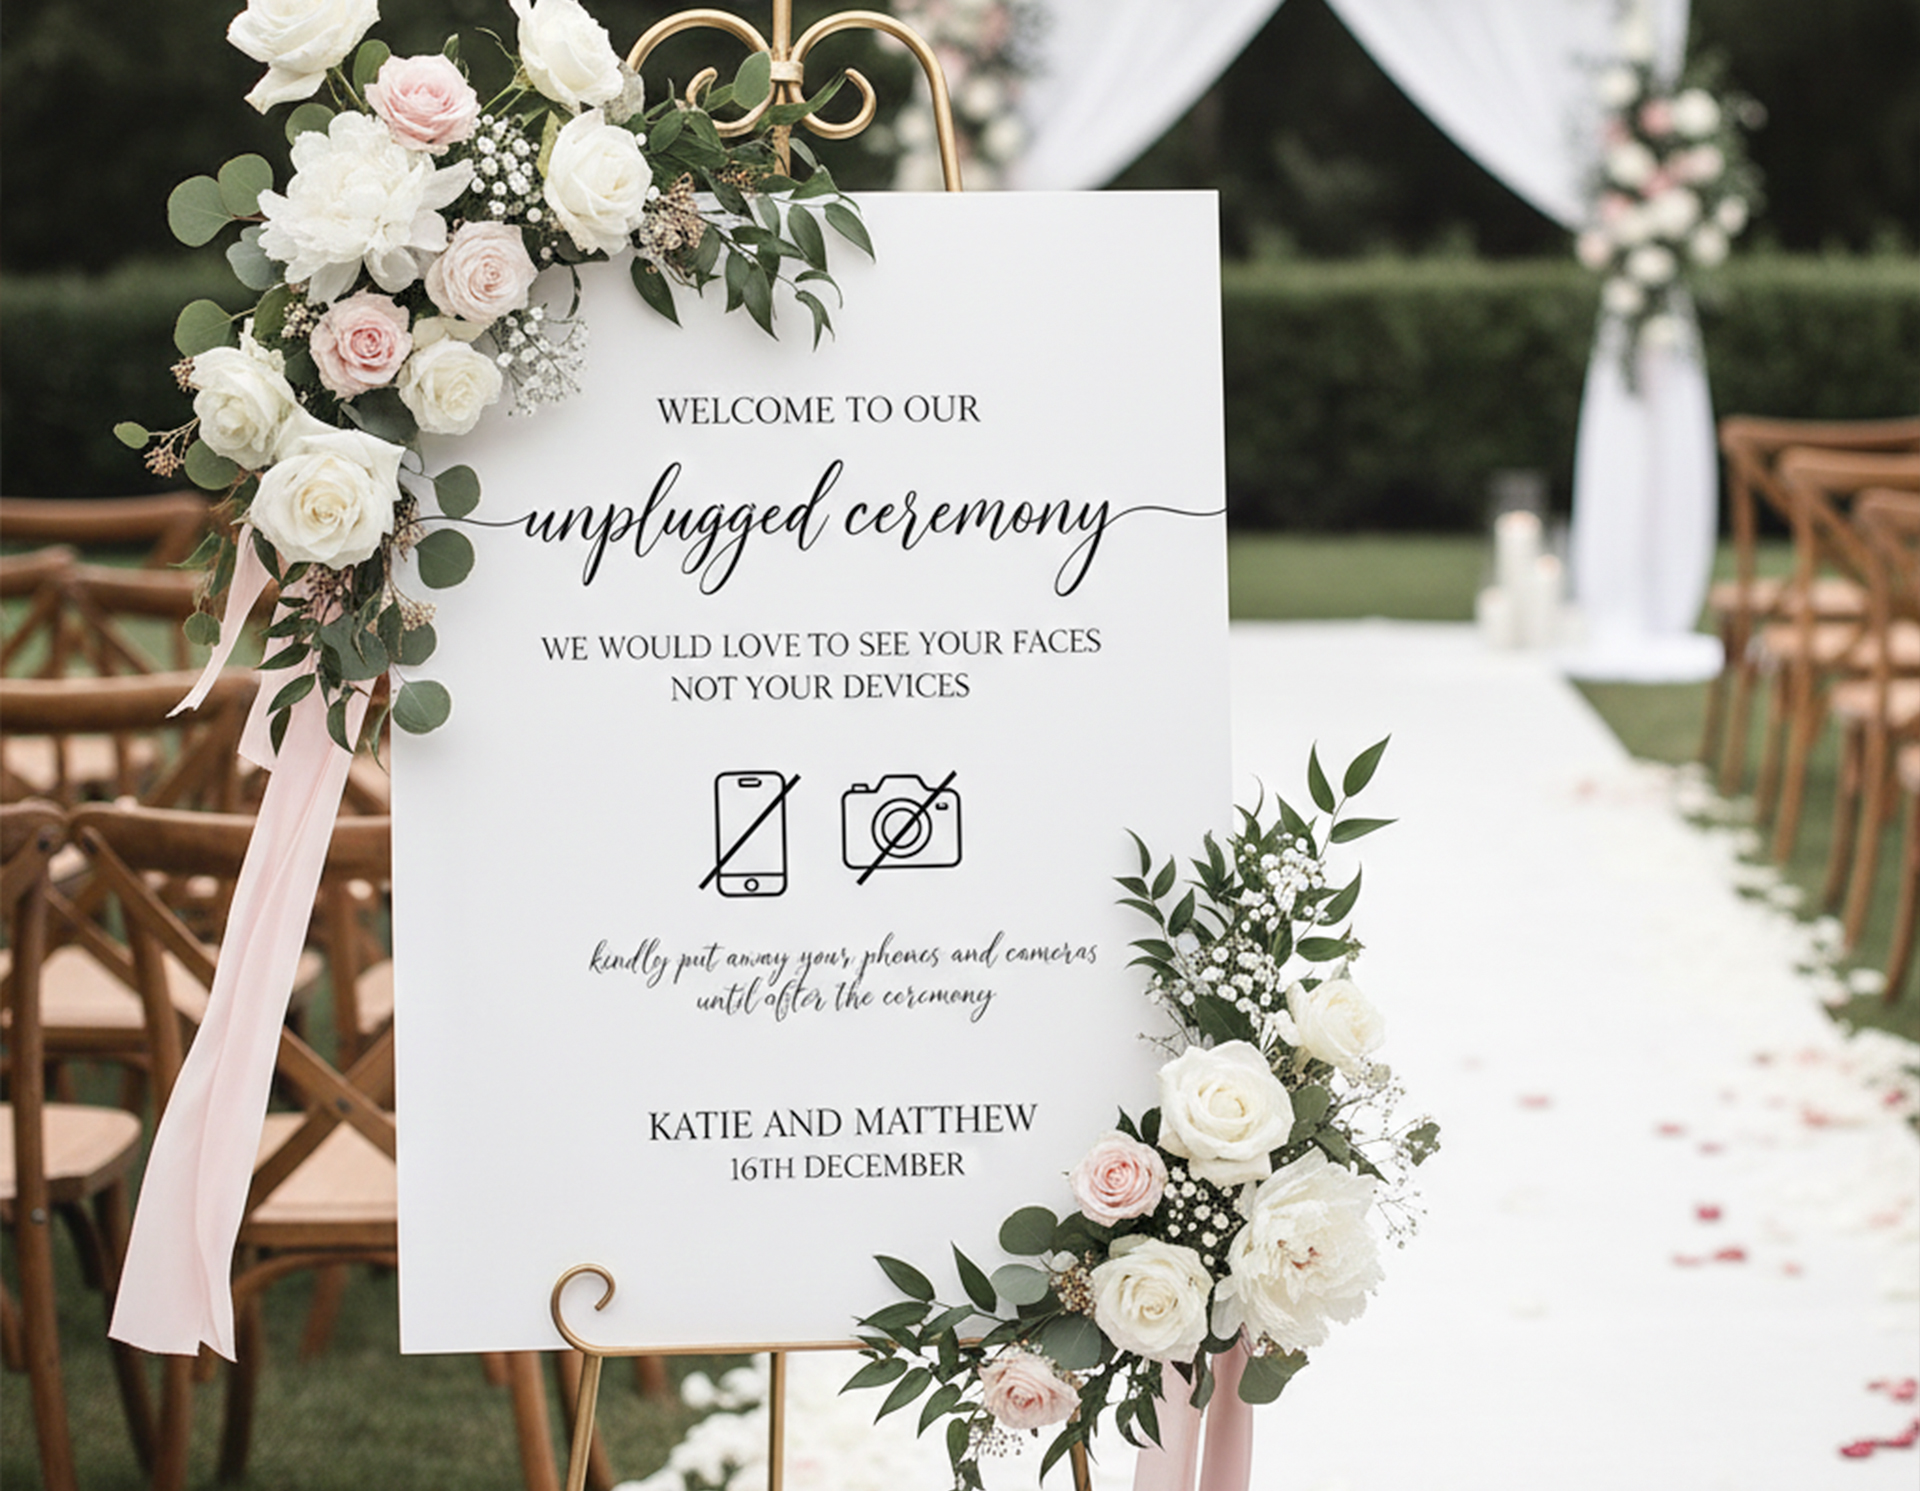
Ceremony Signs
Wedding ceremony signs look adorable, and gently remind your visitors to silence their phones or let them know they can sit wherever they prefer. Event planners generally place these signs throughout the ceremony floor to inform guests of the main rules with cheerful messages.
Directional Signs
These helpful markers guide guests from one beautiful moment to the next and help them navigate through your wedding venue without getting lost or confused. You can spot wayfinding wedding signs near parking lot entrances, venue doorways, or next to stairwells. Navigational design additions are necessary in large venues, as they lead to the main ceremony site, restroom facilities, or reception area.
- Reception Signs at Weddings: They help guests feel oriented, so no one has to ask for directions.
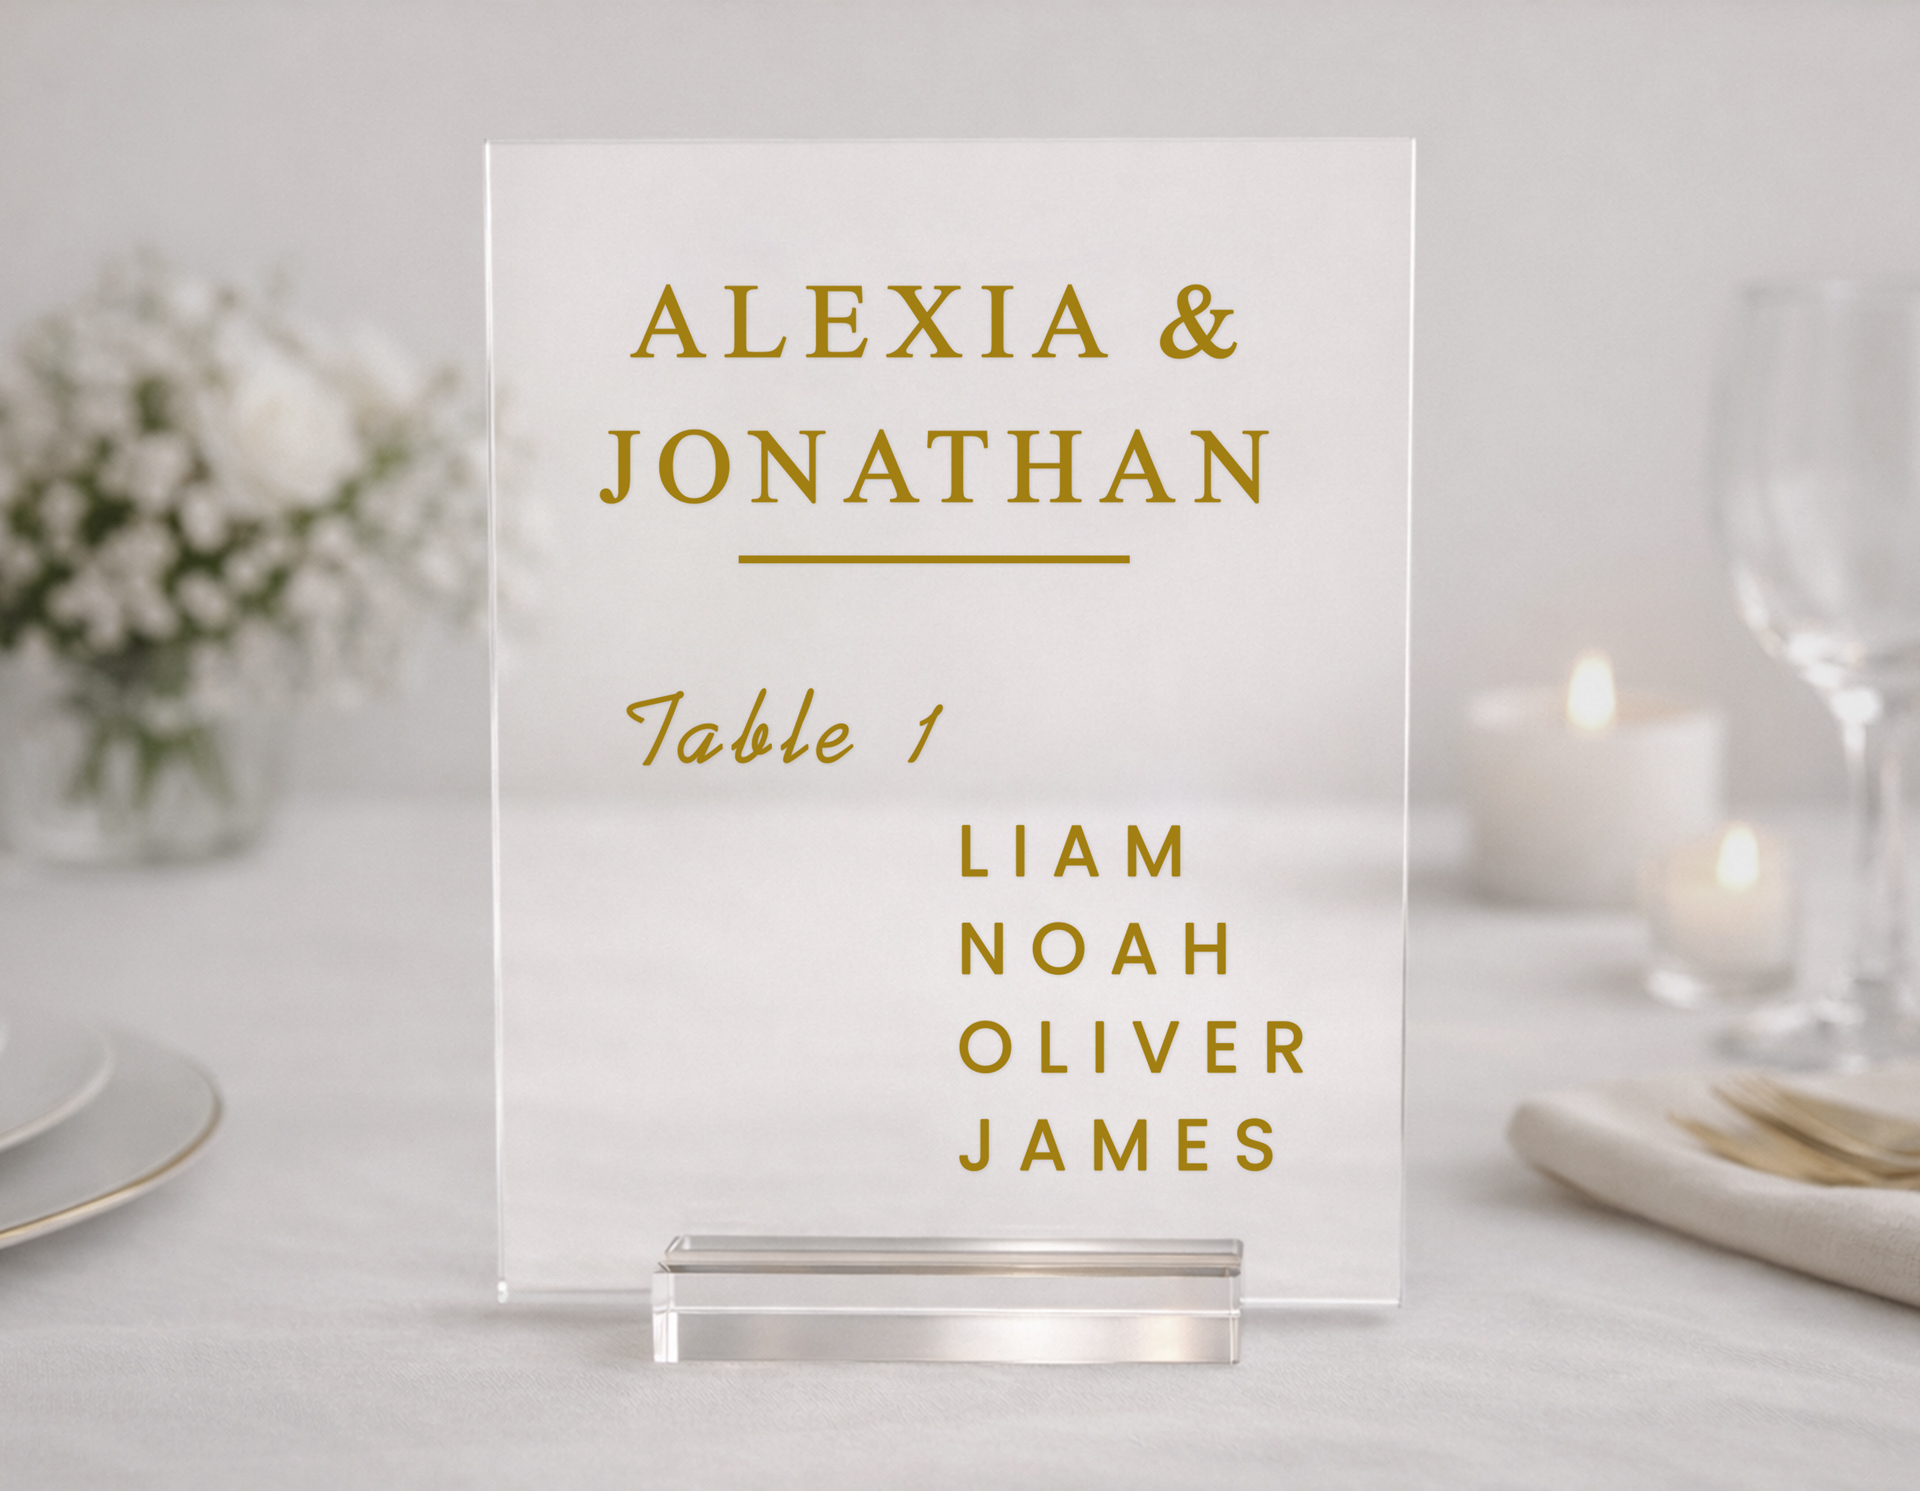
- Seating Chart Signs: Simple or extravagant, these charts provide key information about where your guests will be taking their seats at your wedding.
- Bar and Menu Signs: Both practical and stylish, bar and menu signs you display at your nuptials detail the drinks and feast, setting the mood through creative designs.
- Favor Signs: Consider charming wedding favor sayings printed on beautiful signs to remind your guests to take theirwedding favors with them.
Here’s a little heads-up about how you can make your wedding signs. There are two options: you either make your wedding sign yourself or use a professional online sign-maker. Both have ups and downs, and in this blog, we’re going to break them down for you. You’ll be able to make an informed decision before choosing one. Now, let’s dive into the main types of wedding signs, and then, we’ll go through the ways to make them.
Need trendy ideas for your dream day? Check our article listing wedding sign ideas.
How to Make Wedding Signs: Step-by-Step Guide
You already know you need charming wedding signs for your special day. But what about where to start, how to get them, or what purpose they will serve? This section answers all these questions, guiding you through every stage of the wedding sign-making process.
1. Choose the Sign Purpose
Why is it important? Understanding the main objective of your signage will determine its type, size, and design.
The first factor is whether your wedding will be held outdoors or indoors. Next, decide on the purpose of your sign. Will it be a big welcome sign, a small table sign holding table numbers, or simply a decorative touch to make your venue more pleasant?
Pro tip: Make sure the fonts and colors complement other signs and earmark a budget for premium materials.
2. Create a Mood Board
For lovebirds fresh off a proposal, it’s essential to assemble a wedding mood board before beginning any planning tasks to figure out exactly what you do and don’t like. Your wedding mood board combines emotional collages that capture the overall vibe, style, and aesthetics you’ve been dreaming about for your big day. There’s truly no better way to make a game plan than to craft the imagery of vibey visuals that you can share with your wedding planners.
This is especially helpful as, instead of trying to describe what you want for your wedding, you just show your wedding planners the mood board. Besides, it acts as a decision-making filter. It helps you properly allocate funds and keeps design consistent from acrylic table signs to florals.
3. Select Size and Material
If your friends and family can clearly read what they need, it means you’ve chosen the right size and design for your signage. The sign’s effectiveness hinges on three factors: whether your guests can read it from a proper distance, how it fits in the wedding venue, and whether it helps or confuses your visitors.
On the other hand, the right materials help everything look polished and neat. The rule of thumb is to choose a material that suits your overall venue style.
How to Choose Materials
The material you pick for your wedding signs affects everything from how your signage looks to how much they cost. This is also important in determining whether they’ll work outdoors.
Acrylic: Acrylic signs bring modern elegance to your wedding venue. They’re versatile enough to serve as welcome or wayfinding, menu or favor signs, and are lightweight enough to transport and display.
Pros:
- Stand strong during outdoor ceremonies;
- Feature sharp imagery;
- Can be repurposed for future events, such as anniversaries or parties.
Cons:
- May show fingerprints;
- May scratch if not handled with care;
- May be pricey for large sizes.
Wood: Wooden signs are some of the most popular materials for weddings. They exude organic aesthetics for boho or garden gatherings and can serve as wayfinding designs, decorative elements, or photo booth signs.
Pros:
- Stand firm and won't tip over in windy conditions;
- Work well for DIY signs;
- Show no glare in bright lighting conditions.
Cons:
- Weigh more than other signage options;
- Can warp in humid conditions;
Chalkboards: Couples seeking vintage or farmhouse style may need chalkboard signs, as they offer handwritten charm, adding an informal warmth. Real chalkboards can show an event schedule, display a romantic quote, or serve as menu boards.
Pros:
- Let you change texts fast;
- Can be wiped clean and used again;
- Give a true vintage effect.
Cons:
- Need good handwriting skills;
- Smudge easily when touched;
- Hard to read in dim light.
Metal: Metal signs are luxury statement pieces at any wedding, and create dramatic focal points. Choose this material if you’re planning a modern or an art-decorated wedding. Use them as reserved seating, bar and menu, or directional signs.
Pros:
- Reflect light for a warm glow;
- Fit fancy weddings;
- Built to last and feel substantial.
Cons:
- Are heavy and require sturdy stands;
- Cost more than most other materials;
- Require professional tools and skills to create.
Foam Board: Foam boards are economical options for couples prioritizing budget. This material is very light and easy to carry or ship. They’re great for hashtag signs, photo displays, or ceremony programs.
Pros:
- Cheap option for many signs or large sizes;
- Smooth surface prints colors well;
- Cut easily into any shape you need.
Cons:
- Look cheap next to wood or acrylic;
- Can bend or bow without support behind it;
- Blows over easily in windy conditions unless weighted down.
Fabric: Fabric banners with delicate calligraphy add an air of romance at garden weddings or dreamy coastal celebrations. These designs really pop when used as a photo booth backdrop, congratulatory banners, or entrance decor.
Pros:
- Can print large designs for a low cost;
- Hang well for banners and backdrops;
- Won't break or crack like hard materials.
Cons:
- Wrinkle easily and need steaming;
- Blow around in the wind if not secured;
- Need assembly hardware to hang it up.
How to Choose the Right Sizes
Understanding wedding sign sizes helps you make the right decisions about what will work best for your venue. This section covers the recommended sizes for different wedding sign types.
Welcome signs:
- 18"x24" is great for small weddings with a 50-100 guest count. This size leaves enough room for names, wedding details such as the date, and a sweet message.
- 24"x36" works for medium-sized weddings, meaning it’s just right for most weddings. The guest count may range from 100 to 200 guests who’ll be able to read the details and see graphics from 15 to 20 feet away.
- 30"x40" signs are suitable for larger weddings. Wedding halls, reception areas, or venues holding 200+ guests will benefit from large signs that feature the wedding message you want, including an image of the bride and groom.
Ceremony sign:
- 18"x24" suits venues with fewer than 100 guests. It’s ideal for intimate settings when placed near the entrance.
- 24"x36" ensures readability for larger ceremonies. You can add more detailed info about your wedding party or music selections.
- 30"x40" is used for outdoor, sunlit wedding ceremonies. This size guarantees readability, allowing guests to read the sign without squinting.
Seating chart signs:
- 24"x36" handles up to 100 visitors and ten to twelve tables easily. There’s much space for guest names in a 14-16 point font.
- 30"x40" is the sweet spot for 100-150 attendees, as you can also feature floral graphics or venue illustrations in addition to guest names.
- 36"x48" does the trick for weddings with over 150 guests. The extra space lets you spread out table groupings so multiple people can check the chart simultaneously.
Bar and menu signs:
- 8"x10" is suitable for small bars displaying three to five frink options.
- 11"x14" is designed for better readability and can contain more detailed drink and menu descriptions, ingredients, or fun cocktail names.
- 12"x18" size is for creating a centerpiece above or beside the bar, perfect for full menu displays or decorative style signs.
4. Design the Layout
When it comes to designing the layout of your wedding signs, there are some tips we want to bring to your attention.
- Establish a clear hierarchy of visual elements: Start with the most vital element and finish with the least important ones. If it’s a welcome sign, display the text “Welcome” with the largest font, while keeping secondary elements smaller.
- Avoid overcrowding and prioritize white spaces: Showcase only the more important imagery. Your guests’ eyes need breathing room to digest your wedding sign message.
- Stick to one to two fonts in your design: Set a limit of two font styles at most for your design. This helps avoid over-complication and maintain professional consistency.
- Pair contrasting styles: Use a cursive font for headings and serif or sans-serif fonts for body texts to add sophistication.
- Ensure your text is readable from a distance: If it’s a welcome or a directional sign, it should be readable from 10-15 feet away. For table signs or menus, the visibility should be from 3-6 feet away.
- Use short phrases: Keep your texts concise. Too much information may overwhelm your guests.
5. Make Your Sign (DIY Option)
DIY-ing your wedding sign may seem exciting, as you’ll craft the decoration of your special day with full creative control. On the other hand, investing so much time and effort may seem intimidating. Wondering how to make a DIY wedding sign? We list the main steps you need to make your DIY wedding sign.
- Buy the sign material. Wood, chalkboard, and fabric are the best options as you can cut and bend them easily.
- Acquire the necessary tools: paint pens, vinyl, or stencils to use on the sign materials.
- Prepare the surface of your sign by filling cracks, wiping it clean, keeping it dry, and ironing or stretching fabric.
- Transfer the design by cutting the material into a specific shape.
- Paint the design and let it dry.
- Finish and seal the design with a protective sealer or polyurethane coat.
- Add hardware such as hangers, frames, or stakes to set up your sign.
6. Make and Print Your Wedding Sign (with Online Platforms)
Another way to get stunning signs for your wedding is to use online design tools. These online platforms are easy and functional. They empower you to create almost any design, even without professional knowledge of how to print wedding signs.
- Find a corresponding platform for designing online, such as Square Signs.
- Upload your layout or start designing your own artwork from scratch. You also have dozens of wedding sign templates to choose from.
- Choose the material and appropriate sizes for your signage.
- Make a customized design with personalizable elements. Change background, colors, texts, and any other elements.
- Review the proof and place your order.

7. Display Your Wedding Sign
You have numerous wedding sign installation options. They vary based on the signage type. Easels work for most sign types, allowing them stand in any environment. For lighter signs, hang them on wall hooks or lean them against walls. Small table signs, like bar and menu signs, work well in acrylic stands or frames. Hang custom banners using pole pockets, nylon ropes, or zip ties. Set up retractable banners by inserting the pole into the base, opening the stability feet, pulling the banner up, and sliding the pole into the top slot. For outdoor signs, use weighted bases or stakes pushed into the ground to keep them stable.
Planning an outdoor ceremony? Check out outdoor wedding decoration ideas to make your day feel special.
DIY vs. Online Tools for Wedding Signs
| DIY | Online Platform | |
|---|---|---|
| Pros | • Better cost control; • Adds a personal touch; • Full creative freedom. | • Professional results; • Customizable pre-made templates; • No design skills required; • Saves time and effort; • Access to professional design support. |
| Cons | • Time-consuming process; • Hidden material and tool costs; • Final result may differ from expectations. | • Higher upfront cost; • Added shipping expenses. |
Make Your Perfect Wedding Sign
Every sign at your wedding tells guests where to go, but the best ones also tell them who you are. Whether you've painted them by hand or ordered them online, what matters is that your signs feel like you. Choose wedding signs that fit your vibe, and make sure your guests can actually read them from across the room.
Your big day is waiting. Make signs that turn heads and lead the way.
FAQs
How much do DIY wedding signs cost?
DIY projects may seem lower-cost than online platforms. It’s true for initial costs. But when you’re diving into the main crafting process, unexpected expenses may arise, such as the base material, tools you hadn’t considered, etc. On average, DIY wedding sign pricing ranges from $10 to $100.
When should I start planning and making my wedding sign?
Start planning your signs about two to three months before your wedding, so you can spend time on designing, getting materials, and creating them. If you're using professional online tools, you may not be in a hurry. Consider ordering a couple of weeks ahead of your wedding date to have some time for anything that may go wrong.
Can I combine different materials?
Yes, you can combine acrylic with wood, foam board with fabric to get stunning design combos. The rule of thumb here is to keep the color palette and style consistent.
Any DIY wedding sign ideas?
Put your name and wedding date on welcome signs. You can also display a romantic imagery of your partner and you. Design a seating chart sign on a large mirror. Use creative directional signs, such as floral arrows, pointing to the ceremony or reception. There are many; you need to choose those that best describe your couple.
How to print wedding signs?
You can use any design platform. You may find some basic editors, while others may feature customizable elements with broader opportunities. Create personalized designs and enjoy your big day as you’re supposed to.