


Table of Contents

At first sight, hanging a metal sign might seem simple. But if you do it wrong, you can end up with damaged walls, a cracked sign, or one that moves and shifts. Choosing the right approach will make all the difference, regardless of the type of your signs and where you’ll hang them. This guide will walk you through the best tools and techniques for every material and situation so you can securely set up your metal sign.
Key Takeaways
- Types of metal signs, their weight, setup environment, and mounting surface all play a significant role in determining how to hang metal signs;
- Standoffs are a go-to option for secure and permanent metal sign installations both indoors and outdoors;
- Command strips are a recommended choice for those who don’t want to drill a hole while installing the sign on the wall;
- Zip ties offer a reliable method for installing metal signs on fences or posts.
What Do You Need to Consider Before Hanging Your Metal Sign
Before you start, take a moment to plan. It’s a small step, but it can save you a lot of trouble. A quick check of a few key things before you begin will make the whole job much easier.

Types of Printed Metal Signs
Metal signs are made from a wide range of materials, such as aluminum, steel, copper, brass, and zinc. Each type has its advantages and disadvantages, but when it comes to custom business signage, not all metals are created equal. Steel, for example, is prone to rust. Copper and brass are too heavy, expensive, and harder to work with. Zinc is durable but rarely used for printed signage.
This is why most people opt for different types of aluminum signs. The most commonly found aluminum signs are standard, brushed, composite, and reflective. They can be hung using standoffs, command strips, suction cups with hooks, and zip ties.
Weight Category of Your Sign
Aluminum signs are the lightest option among the four types mentioned above. They have 0.040", 0.060", and 0.080" thicknesses available and weigh 0.564 lbs/ft2, 0.84 lbs/ft2, and 1.127 lbs/ft2, respectively. Command strips are an appropriate setup method for lighter options. Heavier ones often require standoffs.
Reflective aluminum signs’ thickness is 0.125", weighing 0.765 lbs/ft2. These signs are primarily used in outdoor and roadside applications, so we recommend hanging them using more secure methods.
Brushed aluminum signs weigh 0.556 lb/ft² at 0.032” thickness, while composite brushed aluminum signs weigh 0.765 lbs/ft2, being 0.125” thick, allowing for most wall-mounting methods, though standoffs are the preferred option. They complement the premium brushed finish and give the sign a floating look.
Dibond signs weigh 0.765 lbs/ft2 at 0.125" thickness and 1.53 lbs/ft2 at a thickness of 0.25". Use command strips or zip ties for lighter dibond signs. If your signage weighs more, use standoffs.
Indoor or Outdoor Application
Indoor applications offer more flexible mounting options since they’re not exposed to outdoor conditions that might damage your sign over time. Use command strips for lightweight metal signs on walls, or suction cups and hooks for temporary installations on glass surfaces. Easel backs let you place the metal sign on any flat surface without the need to drill the mounting surface. Standoffs are the most secure way to hang a metal sign, whether you're mounting it indoors or outdoors.
Outdoor metal signs need a more secure mounting method. Don’t use command strips, suction cups, or easel backs as they’re less reliable outside. Moisture, heat, and wind will weaken your sign hangers over time. Zip ties are a more practical choice for attaching signs to posts, fences, or railings. Standoffs are the most secure option and the best choice for any outdoor setting.
Surface To Which You Attach Your Sign
Choose standoffs or command strips for smooth, flat surfaces such as drywall. Use suction cups and hooks for glass and tile surfaces. Brick, concrete, or other rough surfaces need a more heavy-duty approach. Screws, bolts, or standoffs drilled directly into the surface are the way to go. Wooden surfaces work great with screws or zip ties.
Tools for Hanging a Metal Sign
Having the right tools on hand before you start makes the whole process faster and easier. It ensures your metal sign stays securely in place.
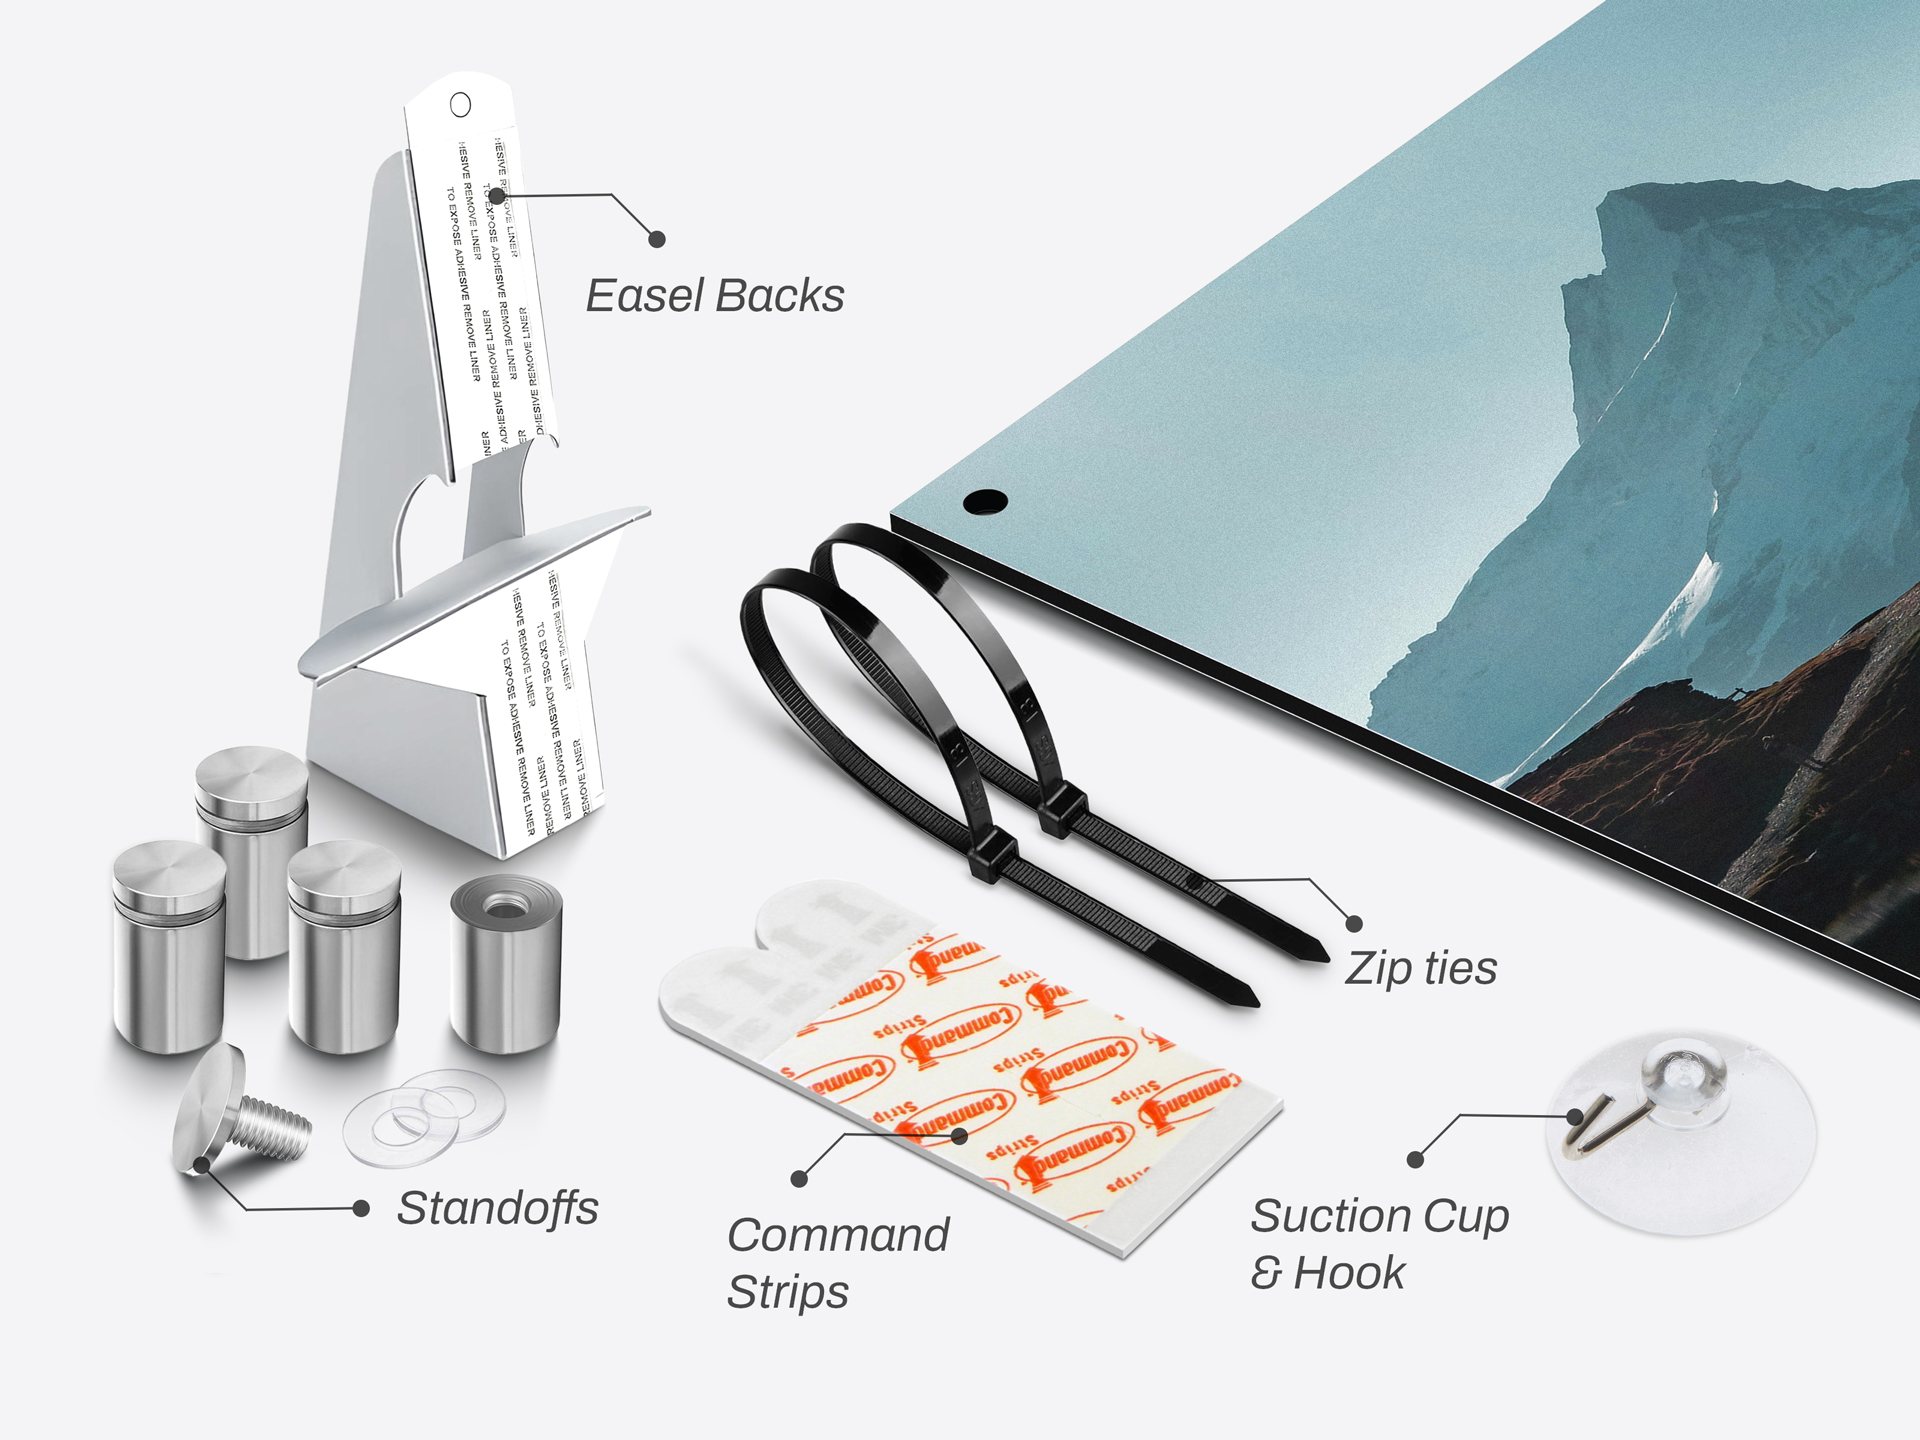
Standoffs
Use standoffs if you want a small but sturdy mounting hardware. It will hold your sign slightly away from the wall, the result of which is a floating look. Standoffs consist of a screw, a barrel, and a cap. They’re one of the most secure ways to hang a metal sign, both indoors and outdoors. To hang your sign with standoffs, follow these steps:
Step 1: Mark and drill holes where you want to hang your sign.
Step 2: Push the anchor into each hole.
Step 3: Screw the barrel onto each anchor.
Step 4: Align your sign with the barrels.
Step 5: Screw the cap into the barrel to secure your sign.
Command Strips
Choose command strips if you don’t want to drill the installation surface. They stick to the back of your sign and the wall surface without the need to use hanging hardware. Command strips are an excellent choice for lightweight metal signs on smooth indoor walls. How does this installation work? Read next:
Step 1: Clean the wall and let it dry.
Step 2: Peel one side of the strip and stick it to the back of your sign.
Step 3: Peel the other side and press your sign firmly onto the wall.
Step 4: Hold for 30 seconds until it feels secure.
Zip Ties
If you wonder about how to hang metal signs without nails, zip ties are your answer. Select them for attaching metal signs to posts, fences, or railings. They are strong, weather-resistant, and easy to use, and are a preferred option for outdoor usage. The setup with zip ties considers the following steps:
Step 1: Level your sign before you start.
Step 2: Thread a zip tie through each grommet.
Step 3: Pull it tight until there's no wiggle and trim the excess.
Nylon Ropes
Get nylon ropes as a flexible option to hang your metal signs, especially if you need to install them outdoors. Here’s how it works:
Step 1: Thread the rope through each grommet or pole pocket.
Step 2: Tie your sign to the mounting point.
Step 3: Pull the ropes tight and trim any excess.
Double-Sided Tape
Go for double-sided tape if you want to mount your lightweight metal signs fast on smooth surfaces. It works best indoors on flat walls and is a good choice when you want a low-profile mount. Read the step-by-step instructions:
Step 1: Clean the wall and the back of your sign and let it dry.
Step 2: Apply tape in vertical strips on the back of your sign.
Step 3: Use a level to mark the position on the wall.
Step 4: Peel the backing, press your sign firmly onto the wall, and hold for 30–60 seconds.
Step 5: Let the adhesive cure before putting any weight on the sign.
Drill and Screws
Drill and screws are a heavy-duty option for hanging metal signs. Use them for permanent mounting that works on almost any surface. This is the most reliable method for larger signs. Below you can find how to install your metal sign with this technique:
Step 1: If your sign has no holes, drill 1/4" holes in the corners.
Step 2: Hold the sign against the wall, level it, and mark the hole spots.
Step 3: Drill pilot holes. Use anchors for drywall, go straight in for wood or studs.
Step 4: Place a washer on each screw and drive them through the sign into the wall.
Step 5: Tighten until firm. Don't overtighten, or you'll bow the metal.
Final Thoughts
Factors, such as where you’ll have them set up, on what kind of surface, or what your sign's weight is, define the type of mounting as the best fit for each situation. The same metal sign can have different mounting options. Everything depends on whether you want it for a temporary or a permanent installation, whether it’s going to be hung inside or outside, and many other factors. Knowing the pros and cons of each setup option will help you have signage that is firmly attached to its place without the fear of being displaced.
Still unsure which option works best for your sign? Contact us, and our team will be happy to help you.
You Might Also Be Interested In


