


FREE SHIPPING ON ORDERS OVER $99
Eligible for ground shipping within the contiguous US. Excludes products over 36” and freight shipping.
10% OFF YOUR FIRST ORDER


Features of Yard Signs:
- Use code YARDSALE15 to get 15% off yard signs. Valid through June 30, 2026.
- Durable and lightweight for outdoor use.
- UV-resistant, long-lasting, fade-proof, single- or double-sided.
- Easy setup with H-stake, spider stake, or grommets.
- Used for celebrations, real estate, promotions, or political campaigns.
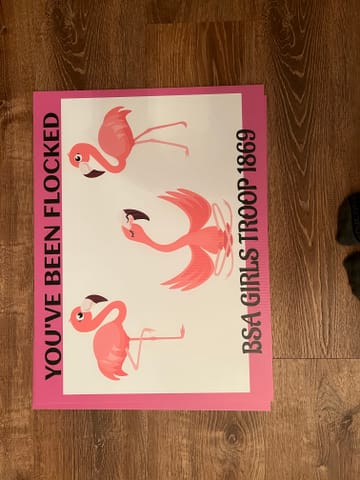
Custom Yard Signs
Capture attention with custom lawn signs. Great outdoor advertising medium for real estate announcements, business promotions, and political campaigns. Easy to customize, can be installed in seconds.
Read More
Features of Yard Signs:
- Use code YARDSALE15 to get 15% off yard signs. Valid through June 30, 2026.
- Durable and lightweight for outdoor use.
- UV-resistant, long-lasting, fade-proof, single- or double-sided.
- Easy setup with H-stake, spider stake, or grommets.
- Used for celebrations, real estate, promotions, or political campaigns.

What are Yard Signs?
Lawn signage offers a simple and effective way to get noticed when you’re looking for real estate signs to promote listings, announce open houses, or draw attention to properties for sale. Business yard signs are a trusted choice for you when you’re looking to advertise promotions, grand openings, and community events without a large budget. These sign options are also great for personal occasions like birthdays, graduations, or showing support for political campaigns and sports teams. They even serve as helpful wayfinding displays, guiding guests to weddings, festivals, and other special gatherings with ease.
Due to their durable design and easy setup, personalized yard signs offer a simple and affordable way to share messages and get noticed outdoors.
Yard Sign Printing Technology
Printing Options
Available Shapes
Size Options for Yard Signs
- 4" × 4": Ideal for ultra-close viewing within 10 feet, perfect for table displays and directional markers.
- 12" × 18": Best for viewing up to 50 feet away, ideal for short messages and simple logos.
- 12" × 24": Readable from 50-60 feet, provides extra space for contact details and calls to action.
- 18" × 24": Visible from 70 feet away, our most popular size for residential yards.
- 24" × 36": Can be seen from 100 feet away, perfect for high-traffic areas and detailed information.
- 96" × 48": Maximum visibility from 200+ feet away, ideal for roadside and large-scale promotions.
Specifications of Yard Signs
| Thickness: | 0.16" | Installation: | Hanging, Ground |
| Weight: | 0.22 lbs/sq ft | Installation Accessories: | Grommets, Zip ties |
| Materials: | Coroplast | H Stake: |
Small – 0.15"Tx10"Wx15"H Big – 0.15"Tx10"Wx30"H |
| Common Sizes: | 12"x6", 24”x12”, 24"x18", 24"x24" | Spider Stake: | 0.6"Tx8"Wx26"H |
| Min. Size: | 4"x4" | Printing Method: | Digital printing with fade-resistant UV inks |
| Max. Size: | 96"x48" | Printing Options: | Single-sided, Double-sided |
| Color: | White | Cutting Options: | Square, Rectangle, Circle, Oval, Overline, Outline |
| Construction: | H-stake, Spider stake metal frame | Lifespan: | 5+ years with proper care |
Common Uses of Personalized Yard Signs

Lawn Signs for Real Estate Advertising

Yard Signs for Businesses

Yard Signs for Events
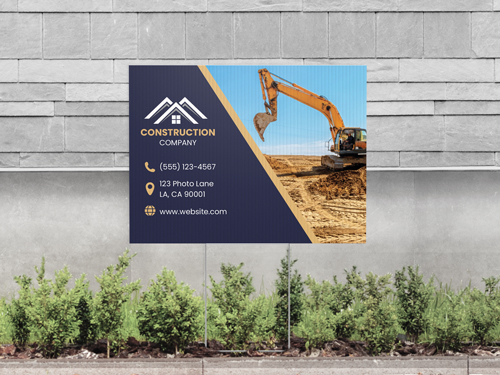
Construction Yard Signs

Directional and Informative Yard Signs

Political and Protest Yard Signs
Products Related to Yard Signs


Create & Print Your Own Custom Yard Sign Today
Yard Signage FAQs
How to make custom yard signs?
- You can create your custom lawn sign with the help of our design tool. Enter our website, head to the tool, and select your product. Choose the size, options, and accessories to create your personalized yard sign. Finding it difficult to design a custom lawn sign with nothing to build on? Apply our customizable templates and change the elements to your liking. Additionally, you can add text, elements, and even a QR code when designing custom lawn signs.
What are custom yard signs made of?
- We utilize quality coroplast for custom-made yard signs. Its lifespan depends on the exterior conditions your custom lawn signs are facing.
How to put up a lawn sign?
- We provide H or spider stakes for yard sign mounting. Check our installation page for detailed steps. Alternatively, you can install your custom yard sign using zip ties if the product includes grommets.
Are there any accessories for installing lawn signs?
- Besides the choice of stakes for the product, the accessories we offer in our menu are grommets and zip ties.
Why are grommets used for yard signs?
- Grommets come in handy for hanging yard signs from a fence. You can go to our tool and get grommets pre-spaced at 1” on each corner of the display.
How much are yard signs?
- The pricing for custom lawn signs varies depending on several factors such as size and accessories. You can refer to the calculator at the top of the product page to check the pricing based on the measurements and quantity. Once you modify the features, including the cutting options or accessories, the prices for custom yard signs will change correspondingly.
What is the size of a personalized yard sign?
- Personalized garden signs range from 4”x4” to 48”x96” in size. The most commonly ordered size for a personalized yard sign is 24”x18”. Keep in mind that when you order these products in sizes greater than 48”x48”, the corrugated flutes will be horizontal and the product will no longer be compatible with stakes.
Where to get yard signs made?
- Are you looking for unique yard sign solutions? We’re a professional sign-making company with years of expertise. Contact us now and design your yard sign in custom shapes and colors.
Do you provide shipping for a lawn sign?
- Yes, we ship yard signs across the US and Canada. Check our terms and policies page to see if this product qualifies for special offers or shipping discounts.
Do you offer discounts for custom yard signs?
- Order a large number of custom yard signs and you’ll receive discounted rates for your products. Our discounts increase with the quantity of products you order.
How to design lawn signs for business and advertising?
- First and foremost, keep it simple and bold. Use large fonts and high-contrast colors so your message pops from a distance. Focus on just the essentials: your business name, logo, contact info, and a short, clear call-to-action. Use an intuitive sign design tool that offers tons of customizable elements to make your design journey easier.
How to clean and take care of lawn signage products?
- Keep your lawn signs looking sharp by giving them a quick rinse with water and a mild soap when dirt builds up. Avoid harsh scrubbing. Check the stakes and frames regularly to make sure they stay straight and secure.
Quality
Value for money
Reviewer Photos

Got what I paid for. Good quality.
Thank you for the great review. We're glad to hear you enjoyed the quality of the product.
Excellent just want I wanted
Thank you so much for your feedback. We're glad to hear you're satisfied with the product.
True to color, layout, and resolution as seen on the laptop screen. Highly recommended, easy to use design tool
Thank you for your review. We're glad to hear that the final product matched your design perfectly. It’s great to know you found our design tool easy to use.
High quality sign. Product was exactly what I envisioned it to be
Hi Brian, Thank you for the awesome review. We're happy to hear that you loved the quality of your sign and that it came out looking exactly how you wanted. We hope to hear from you again soon. Best, Square Signs
Sign came to us with a clean picture of our home featured as the centerpiece. Turn around time was prompt
Hi L, Thank you for your feedback. We’re so happy the sign turned out beautifully with your home as the centerpiece. We're looking forward to working with you again. Best wishes, Square Signs
Excellent work. Looks fantastic.
A letter in a word is cut off
I was very happy with the quality.
The signs came out very colorful, and they are as if I took a picture they are not fuzzy in any way. They are amazing. Thank you.
We had to get yard signs soon, so I decided to ship in rush production. I am impressed! They came very quickly and they were of excellent quality. They've been a great price, too. I'm going to shop again here in the future. Well done, Square Signs!
Yard Sign Templates


